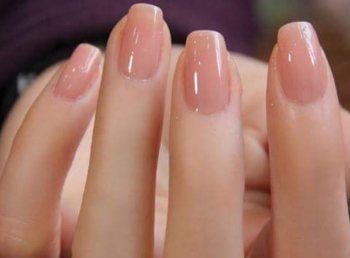
If you’ve tried gel nail polish, then you probably know it’s incredibly durable. With its high-shine and long-lasting color, gel manicures are a popular alternative to traditional nail polish.
Despite its popularity, gel nail polish is notoriously difficult to remove. While many people choose to have their gel manicures removed at a salon, it’s possible to do it yourself at home with a few tips and tricks.
Items needed
Many people prefer removing gel nail polish at home. The process can be lengthy, but it can be painful to have your nails scraped by a nail technician, even if you frequently receive gel manicures.
If you want to remove your gel manicure at home, here are a few supplies you should keep on hand:
- Nail file. Because of the smooth and hardened surface of gel polish, using a nail file to “roughen up” the surface can make it easier to remove the polish.
- Acetone nail polish remover. While non-acetone nail polish remover is a great way to remove traditional nail polish, it isn’t always as effective on gel polish.
- Orange stick or cuticle stick. This can help you gently scrape off any gel polish residue without peeling off your nail polish.
- Cuticle oil or petroleum jelly. Cuticle oil or petroleum jelly can be used to help protect your cuticles and the skin around your nails from any damage done by the nail polish remover.
- Cotton balls. While cotton balls are optional, they can help make soaking the nail polish easier.
- Tinfoil. Tinfoil is often used to hold the cotton balls against your fingernails, allowing the nail polish remover to soak into the polish without submerging your fingertips completely.
- Nail buffer. Using a nail buffer helps smooth the surface of your nails after you’ve removed the gel polish.
- Roughen the surface with a file. The nail file shouldn’t be used to file off the polish — the goal is to remove the shine from the top layer, making it easier for the polish to be removed after soaking or applying nail polish remover.
- Protect your cuticles and skin. You can also apply petroleum jelly to your cuticles and the skin around your nails beforehand to protect them from acetone’s harsh effects.
Methods to try
Before you try any of these methods, it’s important to use a nail file to gently roughen up the top layer of your gel manicure.
Soaking method
The soaking method is a simple way to remove gel polish at home.
This is an easy way to remove gel nails without many tools, but the use of acetone while soaking your fingertips can be incredibly drying to your skin and nails.
To try the soaking method, you can:
- Fill a small bowl with nail polish remover.
- Dip your fingertips into the nail polish remover, and allow your nails to soak for 10 to 15 minutes.
- Check your nails. The polish should begin to lift away from the nail, allowing you to gently scrape off the polish with a cuticle stick.
- After all of the polish has been removed, gently buff your nails to smooth the surface.
- Apply a small amount of cuticle oil to your cuticles to keep them healthy and hydrated.
DIY with tinfoil and cotton balls
While the tinfoil method is similar to the soaking method, this technique allows you to soak just your fingernails in acetone — preventing the rest of your fingertips from coming into contact with it.
This method is a little more complicated if you’re doing it by yourself. By the time you’re on your last few fingers, it can be difficult to apply without help.
To try the tinfoil method, you can:
- Cut or tear your tinfoil into 10 medium-sized squares. Each piece should be large enough to wrap completely around your fingertip while holding a small cotton ball against your fingernail.
- After filing the top of your manicure, soak each cotton ball in acetone, and place it on your fingernail starting with your nondominant hand. Use a piece of tinfoil to secure the cotton-soaked acetone to your nail.
- Allow your nails to soak for 10 to 15 minutes.
- Check your nails. Once again, the polish should begin to lift away from your nails. This should make it easy for you to gently scrape the polish from your nails with a cuticle stick.
- Apply a small drop of cuticle oil, if necessary.
Premade kit
If you don’t want to use the soaking or tinfoil method, you can purchase premade kits to remove your gel nail polish. These kits typically include cotton pads and plastic clips or pre-cut foil to hold the acetone-soaked pads against your nails.
Shop for gel nail polish remover online.
If you want to use one of these premade kits, be sure to look for one that includes a nail file, scraping tool, and a buffer to gently smooth the surface of your nails after removing the gel polish.
What to do for uneven nail surfaces afterward
If your nails are uneven after removing gel polish, you can gently file or buff the surface of your nails to smooth them. Try using a nail buffer block with a fine grain to carefully smooth your nails.
Shop for nail buffer blocks online.
However, if your nails are thin or brittle, be careful not to overfile their surface. Resist the urge to reapply nail polish. Give your nails a couple of weeks to recover from the gel polish.
Make it easier to remove
If you want to make it easier to remove your gel nail polish, here are a few tips:
- Resist the urge to peel off the polish. While it might seem like a safe alternative to using acetone, it can actually cause more damage in the long term. Repeatedly peeling off manicures can cause onycholysis, a common nail condition caused by the nail lifting away from the nail bed.
- File your nails before soaking them. It doesn’t seem like it will make a difference, but it can require more soaking and scraping if you skip this step.
- Try using a different brand of gel polish. Certain brands are easier to remove than others, but that typically means they may not last as long. Ask your nail technician for their recommendations on the easiest brands to remove.
Why it’s so hard to remove
While many nail polish brands may use the term “gel,” true gel nail polish involves applying a base coat followed by several thin layers of polish to give the nails a chosen color.
After each layer is applied it’s cured or hardened under either a light-emitting diode (LED) or an ultraviolet (UV) light, which sparks a chemical reaction that causes the polish to harden more than traditional polish. And it’s why another name for it is nail lacquer.
The bottom line
While gel nails are a popular alternative to traditional nail polish, they can also be difficult to remove. Plus, repeated gel manicures over time are associated with skin cancer risk due to exposure to UV light.
Despite the misconception that LED lamps are safer than UV lamps, ultraviolet A (UVA) light is emitted by both types of lamps. Even if you wear sunscreen, your skin is still at risk for damage since sunscreen doesn’t block UVA light.
If you’re concerned about protecting your nails and skin, stick with traditional nail polish or take steps to protect your skin and nails from damage.
How to Remove Nail Polish from Around the Nails
Painting your nails is a skill that takes a lot of practice. When you’re first starting out, it is very common to get nail polish on fingers surrounding your nails. Even once you think you’ve mastered painting your nails, you may still get polish on your fingers. Luckily, there are a few tricks to help get the nail polish off of your fingers while keeping it on your nails.
1. Have a brush ready. A new, clean eyeshadow brush or an old nail polish brush that you’ve cleaned and sanitized will work perfectly for this. In order to clean a nail polish brush, swirl it around in 2 or 3 drops of nail polish thinner on a plastic plate. Wipe the brush on a piece of cardboard. Repeat this until the brush wipes clean.
- Nail polish thinner is different than remover. It is most commonly used to restore old bottles of nail polish to their old consistency.
- Cardboard is recommended because other materials, like paper towels, will leave lint on the brush.
2. Pour nail polish remover into a small dish. You can use an acetone-based nail polish remover, or another type of remover. Acetone-based ones might damage your brush, so be careful when using them.
- If you don’t have any nail polish remover handy, you can use rubbing alcohol instead.
3. Paint your nails. Choose your desired color. Paint with your basecoat and color. Use as many coats of your colored polish as you need to get the desired color.
4. Cover your brush. Dip the tip of your brush into the polish remover. You only want to dip the tip because the remover will damage the glue and metal crimp over time. Get rid of excess remover by sweeping the bristles of your brush over the rim of the bottle.
- If you don’t wipe the excess remover off of your brush, you’ll end up taking your manicure off along with the polish around your nails.
5. Outline your nails. Carefully trace the outside of your nails with the brush. Be very careful not to run the brush over your nail, because it will ruin your manicure. Once you’ve done this for every nail, touch up any polish on your nails that you need to. Let dry and apply your top coat.
6. Finish your manicure. Once the top coat has dried, you can take a paper towel that you’ve dampened with warm water and folded. Use the folded corner to wipe around the nails to take off any remaining nail polish remover. Don’t forget to wash your brushes to have them ready for next time!
Method 2
Using Warm Water
1. Apply your nail polish. Using the nail polish of your choice, apply your basecoat, color, and topcoat. Two layers of your color typically works best. Check the bottle to see how many coats are recommended.
2 Allow your nails to completely dry. You must let them completely dry before trying to remove any nail polish that happened to get onto your fingers. If you don’t you’ll smudge the color on your nails.
3. Soak your hands. Fill a sink with warm, soapy water. Use a moisturizing soap for an added bonus for your hands. Once you’ve let your nails completely dry, dip your fingers into the sink. Let your nails soak for 2-3 minutes. Feel free to swish them around or simply leave them still.
- If you polish is water based, letting them soak for 5 or more minutes will peel the color off of your nails.
- If you don’t have time to soak your nails, this can easily be done in your shower.
Method 3
Using Elmer’s Glue
- Go as wide as you deem necessary. If you’re typically a very messy painter, make a wide ring around your nail with glue.
- Don’t purposely make more of a mess than you normally would; you’ll just end up wasting nail polish.